Showing posts with label Primitive. Show all posts

Monday, December 11, 2017

~ DIY ~ Christmas & Holiday Salt Dough Ornaments & Handcrafted Primitive Cabins!

~If you click and purchase from any links in this post Primitive Gypsy may make a small commission~


Have you been wanting to make your own ornaments? Or do you need a fun project at home for the kids? This year we moved and since we don't have all of our tools we thought it would be fun to try our hand at Salt Dough Ornaments. We've made different batches for weeks and here are the best ways to do them we've found. These are fairly quick and easy enough that the kids can make them too. You probably have all or most of the ingredients already in your home.


First off what ingredients do you need? Here is a list-
3 cups of All Purpose Flour
1 cup of Cinnamon + a jar with a sprinkle lid (Leave out if you want light Ornaments)
1 cup of Salt
1 1/2 cups (or thereabouts) of Water
Essential oils. Your choice, we used Cinnamon and Clove. Barefut makes an excellent Christmas Time or Tree Blend. You can buy it HERE.
Large Mixing Bowl
Rolling Pin
Spoon
Cookie Cutters
Baking Sheet
Dried Cloves, Juniper Berries or Seeds of some kind. Optional but look nice.
Shaping Tools and/or Toothpicks
String, or Ornament Hooks
Pastry Cutter Optional for all but Cabin.
Cooling Rack is optional but helps
Spray to seal. Optional but they will last longer. This should be the kind that dries clear and can be found at any hardware or big box store. Amazon also has a large selection HERE.


Start out with making the dough. Add all the dry ingredients in your mixing bowl. Stir well until fully mixed. Take out a small amount of this mix around 1/4 to 1/2 a cup and use to dust where you will be rolling and cutting out your ornaments. We did ours on a large wooden cutting board. Set this aside for now. You can also just use cinnamon.

In the measuring cup with your water add a few drops of your Essential Oils of choice. I added about 6 to 8. Stir this well and then gradually pour into your dry mixture while stirring. You may use Fragrance Oils but they don't smell as nice nor are they as good for you. Continue to add and stir your water in. You want a ball of dough. This should not be sticky, but nice and smooth.

Place your dough on your floured counter, table or cutting board. Pat it down and then start rolling. You want it to be about 1/4" thick all around.

Once the dough thickness is the right size start cutting out your shapes. Immediately move them onto your baking pan. You may grease it but I found you really don't need too, especially if you are using stoneware. If you have extra dough just re-roll and start the process over.

Try and use all the dough at once. You may refrigerate it but it becomes difficult to use and dries out fast.

Using either your little cutting tools or toothpicks work out a hole towards the top of your ornaments. Make this a good size to put string or a hook through. You do not need to leave the toothpick in it, it will not close.

Add any cloves, berries or seeds for buttons or decorations. Press these down deep and hard or they will fall off once baked. I love the way the Juniper berries look. You can buy them HERE from Amazon.

Bake the ornaments at 300 degrees for approx 30 minutes. Depending on the size and thickness these can take up to an hour. You want them to be dry but not burnt.

Pull them out of them over and transfer to a baking rack or someplace to dry. Once dry and cool, you can dust them with cinnamon or spray with the Sealing spray and dry. This shouldn't take but a few minutes if that. If you want to dust with cinnamon get them lightly wet, sprinkle the cinnamon over them, blow excess off or lightly shake. Then do the sealing spray. After dry add string or hooks and hang on your tree. You can do so many things with these. We did footprints and carved out Log Cabins. See visual instructions for those below. We did hand and footprints. For those make the dough slightly thicker and evenly press the hand or foot in. We did names and dates and we used our little tools to make our own patterns and designs like snowflakes. Your imagination is the limit.


How to make your own Primitive Log Cabin Ornaments.

Start off following all directions above and then follow the photos and instructions below to shape them! This is where you need the pastry cutter or a knife will do!

First make your dough rectangular, just cut off the excess. Use your tools to draw lines in your dough. As many as you want including one for the cabin roof.

Use your tools to cut off the roof at an angle and then to cut a straight line for the edge of the cabin walls. Save this dough to make your doors and windows.

Take that extra cut off dough and lightly smooth with water. Cut off excess if needed to make the right size door and /or windows. You will also use the water to smooth it down onto the cabin so it will stick. Pat around the door edges into the cabin with your tools. This will ensure the door won't come off. You can also do this and add a chimmney if you'd like. This is a fun added touch.

This is what they will look like without cinnamon dusted on.

I hope you enjoyed our little tutorial on making Salt Dough Ornaments. If you have any questions please don't hesitate to reach out!

~~Rebecca

Wednesday, March 23, 2016

~ New ~ Primitive Log Cabin and Bird Garden Stakes

Anything you buy from here is paid to me as Primitive Gypsy

I think most of you know that I also run a business making artwork, Primitives and Selling Antiques. With Spring coming Don and I have been busy making and selling new items, and I wanted to show them to you. If you are interested in our work your can email us at primitivegypsy@aol.com or visit us on Facebook Pages or Etsy. I will post those links below.

Garden Stakes are $9.75 each. The cabin is around 3x3" and the Birds are about 3-4" tall. Each is HAND CARVED. The stakes are metal and painted to look old. Each Garden Stake has a sealer on it so you can use it outside for years.

The Cabins are our biggest seller. Each is hand carved and painted. The cabins themselves are around 3x3 inches and the stake can run from 13" and up. Then they are sealed for outdoor use. We also make large cabins and small cabins, and even bowl fillers. We make a ton of miniatures..email me for photos and cost. (We try and keep our prices very low)

These are the birds. We started out with the smaller ones, but Don made them look a bit bigger and better detailed I think. We can do either style. They are around 3-5" tall. Stakes are also 13" and up. Each bird is also sealed. We can also make carved birds of any size with no stake. Don can do anything. He did this hawk once that was so awesome.

For any information or pricing please email me at primitivegypsy@aol.com. We do custom orders and just about anything you can dream up from cabins to signs to carvings.

Follow Primitive Gypsy on FACEBOOK

Looking for GOOD Primitive Antiques and Make-dos without all that country junk or lace. Join us at Log Cabin Primitives Buy N Sell on Facebook. Please PM me or one of the other admins to let us know you found us through Primitive Gypsy. We normally only approve people we know, or have mutual Prim friends.

We also list some of our goods on our shop Primitive Gypsy on Etsy.

Saturday, March 14, 2015

~DIY~New Custom Fabrics By Zazzle

~If you click these links and make a purchase, I will receive a small commission.~

I was so excited to find out that Zazzle is now offering custom fabrics. They have a HUGE selection, all different styles. I am always looking for something fun and new for Do it Yourself projects. They offer cotton, linen and polyester. You can find quilting, upholstery, and drapery fabric, and if that doesn't satisfy your creative side you can custom design your own fabrics.

I chose Abraham Lincoln Portrait Fabric and a beautiful Old Music Note fabric which comes in Bach or Chopin. You all know how well these fit my DIY projects. I couldn't wait to try them out. This is super nice quality fabric. Your not going to get anything even close anywhere else.

Would you like to make one yourself? You can order any fabric on Zazzle...and then follow these simple steps.

1- Choose any Zazzle Fabric(s).

2- Rip fabric in a width slightly smaller than what your want to cover.

3- Stitch up the back, this doesn't need to be perfect or even, and actually the less it is the better it looks.

4- I almost always add a second layer of plain fabric. The Mocha Brown and White Classic Ticking Stripes Fabric is great and matches a Primitive style perfectly. Or they have plenty of simple browns.

5- Stitch on your patch (like my Abraham Lincoln Portrait Fabric) or plain. A nice straight stitch will do

6- Coffee Dye Time. I use apprx half a jar of instant coffee, pot of water, a few drops of brown paint and one drop of black paint. Stir, test on a plain piece of fabric. Add more water, coffee or paint till it's a desired color.

7- Dip your item and then put up to dry. If you want it dark you can let it soak. If you want it light dip and remove and then push excess stain off.

That's it. If you mess up quickly rinse your project and start the dye process over.

There are over 3000 styles to choose from. Right now if you use the code STPADDYSDEAL you will get 17% off any order. Be quick this deal ends on St. Patrick's Day!

Shop Custom Fabric on Zazzle

Saturday, March 7, 2015

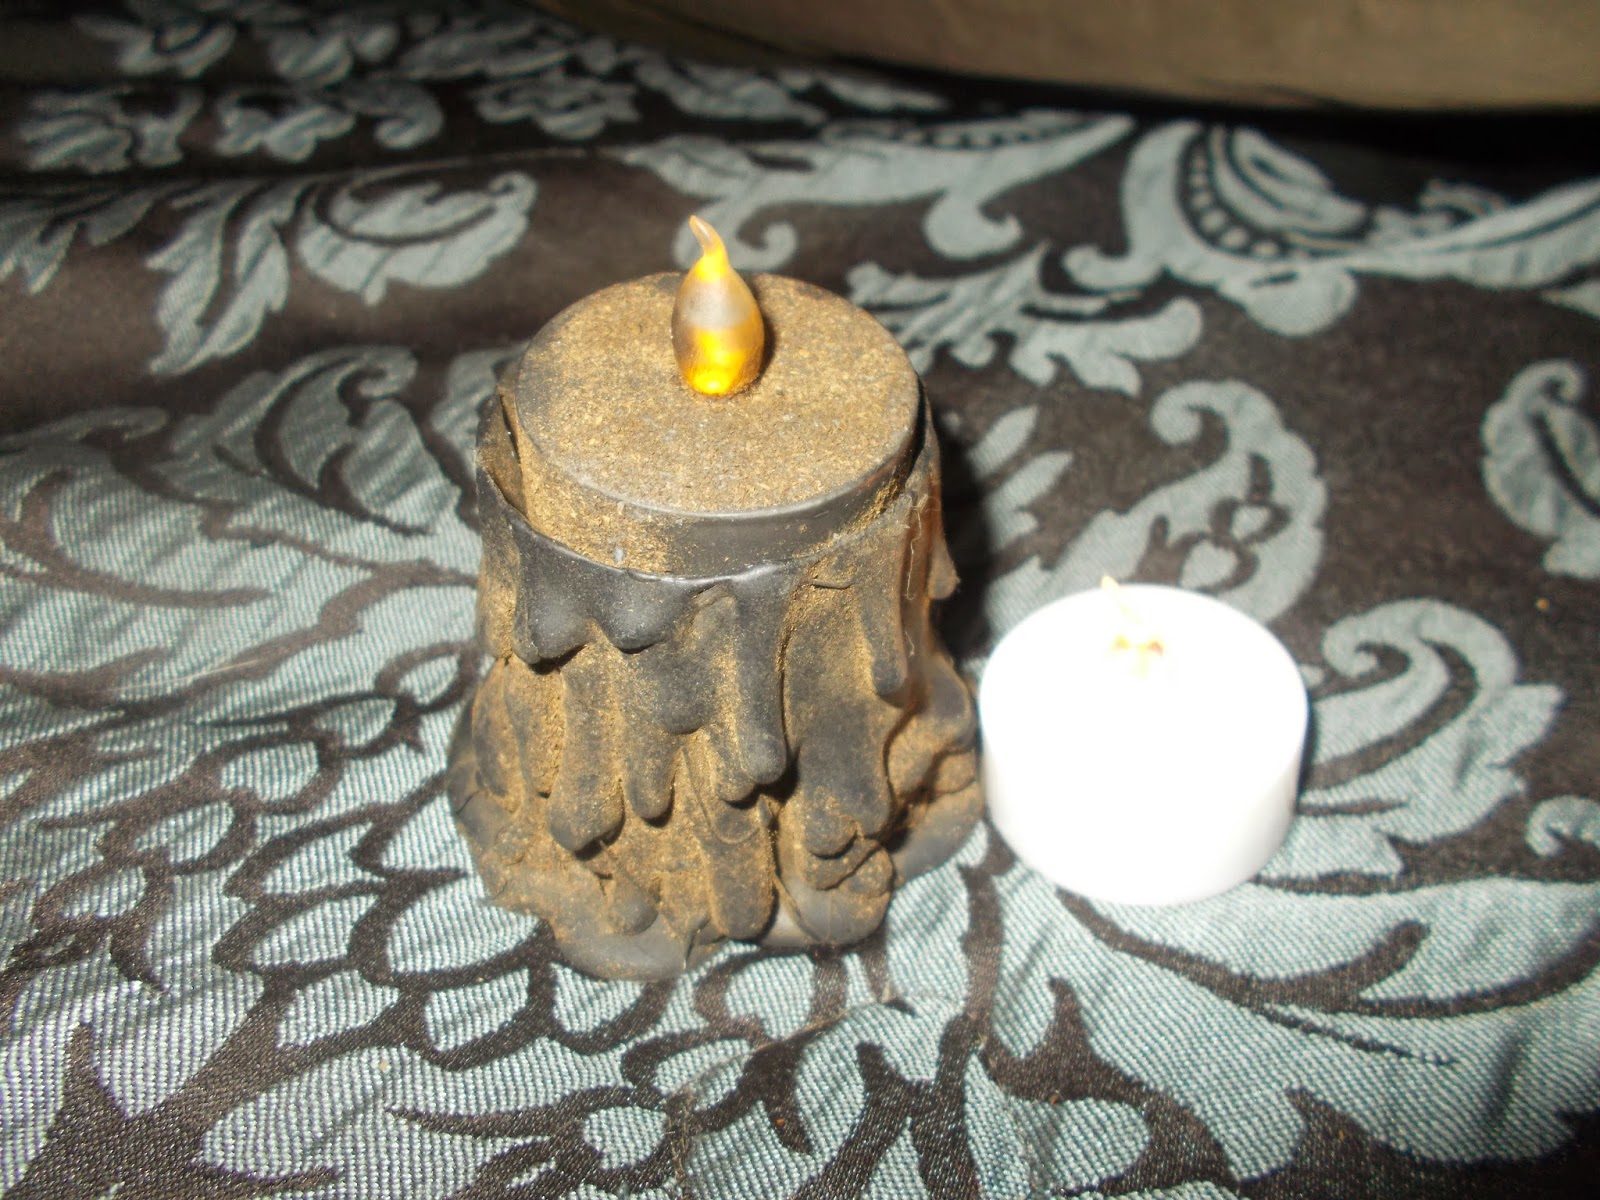
~DIY & Review~ Deluxe Flickering LED Tea Lights - Primitive DIY Tutorial

~I received these for my honest review, all opinions are 100% my own.~

Who doesn't love flickering lights? They are such a good mood setting, but candles can be expensive and dangerous. I have used flicker tea lights for years but am in love with these Deluxe Flickering LED Tea Lights by GETCANDLED. They are super cute just how they come but I like to mix it up a little.

Do it Yourself Primitive Flicker Lights

What you Need- Everything can be found at Wallyworld!

A Pan to heat wax in. I prefer one you plug in. Just leave excess wax in for another project.
Wax (Brown if you can find it)
Brown and/or Black coloring
Cinnamon in a small dish or on wax paper.

1-Melt the wax in the pan, not too hot..you don't want to burn yourself.
2-Add a couple drops of brown coloring, and one of black. Add more as needed.

3-Dip lights in the wax and pull out. Immediately roll in cinnamon.
4-Repeat step 3 a couple times till it's the thickness you desire.

These pretty much dry instantly. Put in a dish or on your table...That's it!

Want to buy a box of your own to try? You can buy them on Amazon.

Wednesday, December 17, 2014

~Giveaway~ Set of Hand Carved Wooden Ornaments

Having my first giveaway on my own facebook Page. I would love for you to enter! Go to Primitivegypsy on Facebook to enter.

This is a WIN with a friend event. When you head over to Primitivegypsy make sure you comment and then tag your friends! If you win one of them will win also!

To see more photo's please visit our Etsy site Primitive Gypsy

~This giveaway in not endorsed or sponsored by Facebook. All items will be provided by Primitivegypsy

Sunday, December 14, 2014

~DIY~ Primitive Rustic Nativity

I love to make things...and I've been wanting to make a more Primitive Nativity scene for years. I've done some one with glitter, and have some store bought ones but none of those really fit my home. This one does!

Today I am going to show you how to make your own Primitive Nativity!

What you will need
Pot or Jar
Paint Brush- good size
Glue gun
Jar of Instant Coffee (any kind)
Needle & String (not thin sewing thread)
Osnaberg (or similar beige fabric that tears easy)
Batting (I used a piece from an old ripped up quilt)
Three Old Clothespins or Round Dowels cut to size, two tall one short
Small Wood Strip Cut to size (Thin is best, about 1 1/2" to 2" wide)
Two Acorn Caps
Bunch of Twigs
Knife or something to cut twigs

Optional Items
Small bottle of brown craft paint
Cheesecloth

First things first cut the batting to fit around the clothespins. You don't want a huge amount of overlap. Next tear slightly smaller strips of Osnaburg to go around the batting. You will also need a small rectangular piece of osnaburg to go over the baby Jesus' head and another for the padding in the manger.

Wrap the batting around your clothespin and sew closed.

Next wrap the osnaburg around your clothespin. No need to sew this cloth. Next you will wrap the string around. Do NOT cut this off of your roll of string as you never know how much you will need. If you want to make Joesph like I did you will also need to do it up and around the back side. See the photo if you need help. I learned fast that the best way to get the V shape was to NOT go all the way to the top of the batting, go up and across then around the back then back down and across.

When you are ready to tie it off cut your string leaving quite a bit extra and use the needle to run it under the rest of the thread twice and then knot.

On the baby Jesus the only difference is before you put the osnaberg wrap you will do the cap. Fold it over the sides and back then sew it around attaching it to the batting like so and knot. The repeat the osnaberg and string. If you want added texture you can wrap some cheesecloth around before the string.

Next you will need to make your coffee dye. I made mine dark by adding some of the brown paint, but you don't have to. Add about 4 scoops of the instant coffee to your pot or jar and then add water until it's the color you like. Test on another piece of fabric if your not sure of the color. If you do add paint, don't over add. You can always add more if needed. If you mess up and get it too dark rinse off your fabric with cold water and start again.

Put your Mother Mary, Joesph and Baby Jesus and the manger blanket in the coffee dye and let soak for a few minutes. Then pull out to dry. I recommend a baking tray, putting the heads on the edge so any excess dye flows away while drying. I usually lay mine by our wood burning stove for faster drying. You can also do it in the oven, but keep a good eye on it or it will end up black and you'll start a fire. The oven will also make it have darker streaks across it. Some people LOVE that but I am not one of them.

While your Holy Family are drying you will begin your manger for the Baby Jesus. Turn on your glue gun. You'll need to cut your twigs, Mine were around 2 1/2 to 3" long. Make sure the four twigs for the cross part of the stand are identical in size and width. Take your glue gun and glue the cross pieces together. I tied them for extra support with string. I wrapped it around a few times and tied it off. Do both sides.

Next put the initial center twig down, using the biggest one you have on the bottom, going down in size as you go up the manger. Glue on both ends as you go.

Your finished manger should look similar to this.

Once your manger glue is totally dry which it should be quickly, take the paintbrush and brush some coffee dye onto the string wrapped around your manager till it's dark enough for you. Let sit to dry.

Once Mother Mary, Baby Jesus and Joesph are dry they should look similar to this and this is what you should have left to work with.

You will need to glue the hats on the clothespins and then glue them to the wood bases. All you need to do is use your glue gun to glue the middle and back of their heads and attach the acorn caps and then around the bottom of the fabric wrapped around them. Then just sit on the stands. It will be dry almost as soon as you do it. Lastly put Baby Jesus and the manger blanket in the manger and voila You are DONE!

This idea is 100% of my own design. If you need any help please feel free to leave me a comment or contact me on facebook!