Showing posts with label DIY. Show all posts

Monday, December 11, 2017

~ DIY ~ Christmas & Holiday Salt Dough Ornaments & Handcrafted Primitive Cabins!

~If you click and purchase from any links in this post Primitive Gypsy may make a small commission~


Have you been wanting to make your own ornaments? Or do you need a fun project at home for the kids? This year we moved and since we don't have all of our tools we thought it would be fun to try our hand at Salt Dough Ornaments. We've made different batches for weeks and here are the best ways to do them we've found. These are fairly quick and easy enough that the kids can make them too. You probably have all or most of the ingredients already in your home.


First off what ingredients do you need? Here is a list-
3 cups of All Purpose Flour
1 cup of Cinnamon + a jar with a sprinkle lid (Leave out if you want light Ornaments)
1 cup of Salt
1 1/2 cups (or thereabouts) of Water
Essential oils. Your choice, we used Cinnamon and Clove. Barefut makes an excellent Christmas Time or Tree Blend. You can buy it HERE.
Large Mixing Bowl
Rolling Pin
Spoon
Cookie Cutters
Baking Sheet
Dried Cloves, Juniper Berries or Seeds of some kind. Optional but look nice.
Shaping Tools and/or Toothpicks
String, or Ornament Hooks
Pastry Cutter Optional for all but Cabin.
Cooling Rack is optional but helps
Spray to seal. Optional but they will last longer. This should be the kind that dries clear and can be found at any hardware or big box store. Amazon also has a large selection HERE.


Start out with making the dough. Add all the dry ingredients in your mixing bowl. Stir well until fully mixed. Take out a small amount of this mix around 1/4 to 1/2 a cup and use to dust where you will be rolling and cutting out your ornaments. We did ours on a large wooden cutting board. Set this aside for now. You can also just use cinnamon.

In the measuring cup with your water add a few drops of your Essential Oils of choice. I added about 6 to 8. Stir this well and then gradually pour into your dry mixture while stirring. You may use Fragrance Oils but they don't smell as nice nor are they as good for you. Continue to add and stir your water in. You want a ball of dough. This should not be sticky, but nice and smooth.

Place your dough on your floured counter, table or cutting board. Pat it down and then start rolling. You want it to be about 1/4" thick all around.

Once the dough thickness is the right size start cutting out your shapes. Immediately move them onto your baking pan. You may grease it but I found you really don't need too, especially if you are using stoneware. If you have extra dough just re-roll and start the process over.

Try and use all the dough at once. You may refrigerate it but it becomes difficult to use and dries out fast.

Using either your little cutting tools or toothpicks work out a hole towards the top of your ornaments. Make this a good size to put string or a hook through. You do not need to leave the toothpick in it, it will not close.

Add any cloves, berries or seeds for buttons or decorations. Press these down deep and hard or they will fall off once baked. I love the way the Juniper berries look. You can buy them HERE from Amazon.

Bake the ornaments at 300 degrees for approx 30 minutes. Depending on the size and thickness these can take up to an hour. You want them to be dry but not burnt.

Pull them out of them over and transfer to a baking rack or someplace to dry. Once dry and cool, you can dust them with cinnamon or spray with the Sealing spray and dry. This shouldn't take but a few minutes if that. If you want to dust with cinnamon get them lightly wet, sprinkle the cinnamon over them, blow excess off or lightly shake. Then do the sealing spray. After dry add string or hooks and hang on your tree. You can do so many things with these. We did footprints and carved out Log Cabins. See visual instructions for those below. We did hand and footprints. For those make the dough slightly thicker and evenly press the hand or foot in. We did names and dates and we used our little tools to make our own patterns and designs like snowflakes. Your imagination is the limit.


How to make your own Primitive Log Cabin Ornaments.

Start off following all directions above and then follow the photos and instructions below to shape them! This is where you need the pastry cutter or a knife will do!

First make your dough rectangular, just cut off the excess. Use your tools to draw lines in your dough. As many as you want including one for the cabin roof.

Use your tools to cut off the roof at an angle and then to cut a straight line for the edge of the cabin walls. Save this dough to make your doors and windows.

Take that extra cut off dough and lightly smooth with water. Cut off excess if needed to make the right size door and /or windows. You will also use the water to smooth it down onto the cabin so it will stick. Pat around the door edges into the cabin with your tools. This will ensure the door won't come off. You can also do this and add a chimmney if you'd like. This is a fun added touch.

This is what they will look like without cinnamon dusted on.

I hope you enjoyed our little tutorial on making Salt Dough Ornaments. If you have any questions please don't hesitate to reach out!

~~Rebecca

Tuesday, July 26, 2016

Hate your old Appliance? Make it look like new with Faux Decor

~I received this free for my honest and unbiased review. All opinions are my own. If you click on a link on this page PrimitiveGypsy may make a small commission~

I have the ugliest fridge. It's one of those yellowish old one's no one owns anymore. But I am broke and so I can't afford a nice new shiny fridge. I also live in an old house that can't hold one of those big double doors, water lined, appliances. So I settled for a little old looking fridge that stands out like a sore thumb in my gray and black kitchen. We just remodeled and are done with all but the floors so it really is awful.

I loved the idea of a faux finish and just a few weeks before was looking at chalk painting our fridge. When I looked into EZFaux Decor I was like that is going to be my solution. Chalk paint is super expensive and well not so easy to keep clean. This was perfect because it can be wiped down just like a real fridge. We had a few options but we went for the Stainless Steel. It comes in a nice long box and on a roll. It has a paper backing and comes with a little squeegee tool. All you really need is some time, a clean fridge and a box cutter.

My husband, of course, volunteered to attempt this. The poor guy, you have to give him credit. I just stayed out of the way. Now we have a smaller apartment sized fridge and this probably took him 2 1/2 hours. So if you have a big fridge plan for a few hours. They have some great videos you can watch on how to install HERE.

Once it was all said and done I was pretty pleased with the results. It looks 100 times better than the awful color it was before and I didn't have to paint or buy a new fridge. It's hard to get a photo of the stainless but you get the idea. They also have Marble and Granite looks which is fun. You can replace your ugly old laminate counters or redo any of your appliances, and more. They sell on Amazon HERE and you can see all the styles and color choices.

Monday, April 4, 2016

Blogger Opp Keda Dye (Wood Dye Colors Kit) Giveaway ~ 5 Winners! #Free & #Paid Options Available

Blogger Opp ~ Keda Dye (Wood Dye Colors Kit) Giveaway ~ 5 Winners! #Free & #Paid Options Available

KedaDyesGiveawayButtonDeliciously Savvy Is hosting a super cool Giveaway for anyone that is looking to do any DIY projects involving wood furniture, wood accessories, guitars, etc. Fabulous for crafters.... or well for anyone looking to get creative and make something into a one of a kind masterpiece. The colors are customizable and amazing and you can tweek them to fit your needs. I am going to be refinishing an item that is apecial to me and will be posting the review with the giveaway HTML...so stay tuned. I actually have several in mind :) NOW.... Deliciously Savvy needs your help as I can never do it without each and every one of you! 5 Lucky Winners will receive 2 Dye Kits from Keda Dye (Total RV $160 /$32 RV per winner) Free & Paid Options Available ~ Sign Up Today!

Sponsored By : Keda Dye

Hosted By: Deliciously Savvy

Co-Hosted By: ???

KedaDye222

Now…. Deliciously Savvy Needs Your Help Promoting! I cannot do it without each and every one of you so please sign up today! Thanks so much!

1 FREE Link For Agreeing To Post Giveaway On Time and Promote 3 to 4 times a week Via Social Media. (Choose from Facebook, Twitter, or Pinterest Only!)

PLUS Snag a 2nd & 3rd FREE Link OF YOUR CHOICE…. If You Post The Announcement!!! (ANY Social Media LINK YOU CHOOSE (except Google+)

ANNOUNCEMENT POST

Co-Hosts Wanted & Needed ~ $5 for 5 links of your choice (and I mean any you choose other than Google+). You can do Facebook Comments, Blog Comments, Giveaway Entries, Daily Votes, Social Media Follows of your choice, Secret Word Pages ANYTHING! PLUS the 3 FREE links above gives you 8 Links Total! Co-Hosts will also be promoted via graphics and link backs to their site via extra follow pages & Co-Host Pages! (# of extra follow pages depends on # of sign ups so promote, promote, promote!) Co-Hosts are not required to post announcement but it is greatly appreciated!

Other Sign Up Options Available On Sign Up Form

SIGN UP HERE

Sign Ups Close 4/21

Giveaway Dates: 4/23 12AM EST until 5/20 11:59PM EST

Open To US and must be 18+ to enter

Savvy Challenge!!! The Blogger With The Most Referrals will Receive a FREE Co-Host Spot On This Giveaway or a Future Giveaway! Promote Away and Make Sure They Know To Say You Sent Them! Minimum of 4 referrals to win free spot on next promotion or promotion you choose.

Tuesday, June 23, 2015

~Review~ Epica Hand Held Shower Head with Extra-Long Hose

~I received this for my honest review, all opinions are 100% my own.~

We really needed a new shower head when we moved into our new (old) farmhouse. It had a terrible shower head. So I was thrilled to try this one out. It's not overdone, just nice and simple. It has a nice sleek clean look and not overly fluffy or frilly. The cost is great at below $20.

This is so simple to install, around 10 minutes if that. It has a beautiful shine to it. The hose is much longer than most hoses and has been super useful for bathing my babies and our dog. It has three different pressure settings which is honestly all you need!

I really love the simplicity and ease of the Epica Hand Held Shower Head. It's just a good quality item at a great price. You can get your own kit on Amazon.

Monday, March 23, 2015

~Review~ Ezy Pruners Ratchet Pruning Shears

~I received these for my honest review, all opinions are 100% my own.~

Ok, so I have terrible painful joints and muscles and am super weak. I love these Ezy Pruners Ratchet Pruning Shears because they have a ratchet feature. This made cutting and trimming the tree's and bushes in our yard so simple for me. Do you have arthritis? Or maybe an elderly relative that love's gardening? These are the perfect Pruning Shears for them. They are also nice and light weight.

The Ezy Pruners Ratchet Pruning Shears are a high carbon steel blade. They tend to stay sharp and last longer than a regular blade will. The Ezy Pruners Ratchet Pruning Shears have a Teflon coating to keep sap and rust off your Shears.

My husband and I both tried these out in our yard. We just moved and the plants here are a mess and need some serious pruning. He was most pleased with the ratcheting feature and I loved how light and easy they were to use. I could handle quite a bit of pruning with the Ezy Pruners Ratchet Pruning Shears without them causing me much pain.

You can buy the Ezy Pruners Ratchet Pruning Shears on Amazon! They are very reasonable.

Saturday, March 14, 2015

~DIY~New Custom Fabrics By Zazzle

~If you click these links and make a purchase, I will receive a small commission.~

I was so excited to find out that Zazzle is now offering custom fabrics. They have a HUGE selection, all different styles. I am always looking for something fun and new for Do it Yourself projects. They offer cotton, linen and polyester. You can find quilting, upholstery, and drapery fabric, and if that doesn't satisfy your creative side you can custom design your own fabrics.

I chose Abraham Lincoln Portrait Fabric and a beautiful Old Music Note fabric which comes in Bach or Chopin. You all know how well these fit my DIY projects. I couldn't wait to try them out. This is super nice quality fabric. Your not going to get anything even close anywhere else.

Would you like to make one yourself? You can order any fabric on Zazzle...and then follow these simple steps.

1- Choose any Zazzle Fabric(s).

2- Rip fabric in a width slightly smaller than what your want to cover.

3- Stitch up the back, this doesn't need to be perfect or even, and actually the less it is the better it looks.

4- I almost always add a second layer of plain fabric. The Mocha Brown and White Classic Ticking Stripes Fabric is great and matches a Primitive style perfectly. Or they have plenty of simple browns.

5- Stitch on your patch (like my Abraham Lincoln Portrait Fabric) or plain. A nice straight stitch will do

6- Coffee Dye Time. I use apprx half a jar of instant coffee, pot of water, a few drops of brown paint and one drop of black paint. Stir, test on a plain piece of fabric. Add more water, coffee or paint till it's a desired color.

7- Dip your item and then put up to dry. If you want it dark you can let it soak. If you want it light dip and remove and then push excess stain off.

That's it. If you mess up quickly rinse your project and start the dye process over.

There are over 3000 styles to choose from. Right now if you use the code STPADDYSDEAL you will get 17% off any order. Be quick this deal ends on St. Patrick's Day!

Shop Custom Fabric on Zazzle

Wednesday, March 11, 2015

DIY Floral Arrangement Kits by Bloominous

~This is a sponsored post, I do not make anything from the links.~

I love DIY projects as you all know. Don and I plan on officially having our wedding next year in March so I have been looking for great DIY floral arrangement idea's. But as you all know I have Lupus and don't have much energy to spare. The thought of a wedding has me wanting to run for the hills.

This made me turn to Bloominous. The mission at Bloominous is to finally make DIY flowers for your wedding or other event's, easy. I am all about easy but still having beautiful things. They help you to achieve that.

How it Works!

Real People who DIY- The designers at Bloominous are more than just wedding florists. They are also individuals just like you, who have a passion for DIY and experience as floral designers.

Everything you Need- Normally you would have to shop at several different flower markets, visit local crafts store and more to make your flower arrangements come together. That's a lot of work. Bloominous has partnered with the best floral farms in the world to provide you with all the beautiful blooms you need to make the arrangements you see on the site. They even include the vases, ribbons, pins, wires, etc so you don't have to worry you'll need anything.

Fast & Easy DIY: They prepare your kit so you're ready to go right out of the box. Your flowers are cut-to-order at the farm, de-thorned and trimmed, and hydrated with nutrients for the journey to your home. Included are step-by-step photo instructions so you know exactly what to do. There's no faster way to successfully DIY your own wedding or event.

Bloominous offers a number of different collections or you can build your own by sharing your design ideas, color, even your pinterest boards. They even offer a trial kit so you can see and plan with your flowers pre-wedding or event. I think my favorite collection is the "Vintage Cottage" Collection.

Are you getting ready to plan a wedding, Birthday, Shower or other event? Check out Bloominous today and take advantage of the ease that can be DIY!

Also look Bloominous up on Facebook, Twitter, Instagram and Pinterest!

Monday, March 9, 2015

~Review~ Chalkboard Labels by Cestari Kitchen

~I received these for my honest review, all opinions are 100% my own.~

I love labels, and use them all the time. Normally I slave away making fabric one's and sewing or gluing them on. This takes ages, especially for large projects. So when I was asked to review these Chalkboard Labels by Cestari I knew this would be such a time saver.

These are just so easy. Use your chalk marker (or chalk) and write on a label. Then peel and stick where ever you want it. Don't have a chalkboard marker? Cestari will give you one when you buy the labels FREE! The marker has a very fine tip. It doesn't smear, drip or streak. Yes! They are erasable also. Just use a damp cloth to wipe off. Even better, you can use the Cestari Chalk Pen on glass, mirrors, vinyl, etc.

This Chalkboard Labels by Cestari set includes 52 labels in a few different sizes. This makes them good for any size project from Mason Jars, to drawers, to note's for your kids. Did I mention that they are reusable? You can remove them by heating them up and peeling off, then place where you want them. So if you stick them on crooked the first time, no problem. I love that they have a shaped edge and are not just square, so much prettier.

You can buy your own set of Chalkboard Labels by Cestari Kitchen on Amazon. Don't forget your free Cestari Chalk Pen. The details are on the page.

Saturday, March 7, 2015

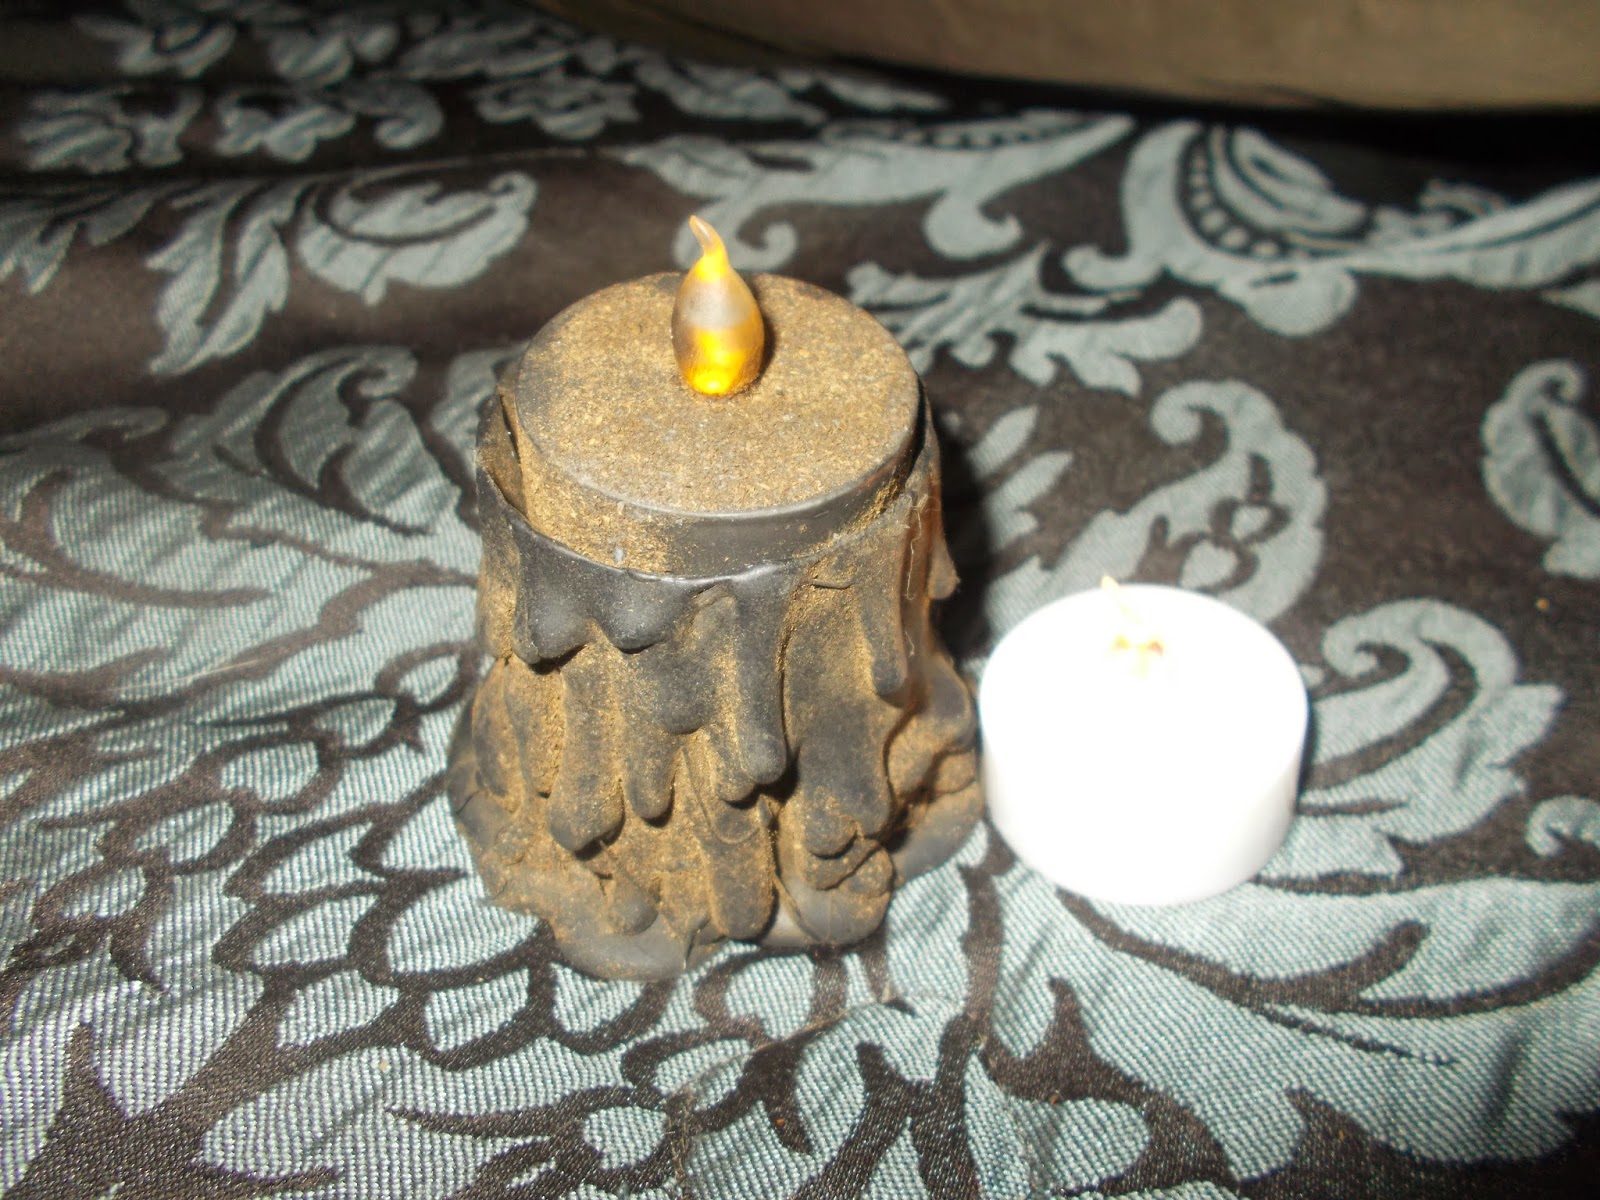
~DIY & Review~ Deluxe Flickering LED Tea Lights - Primitive DIY Tutorial

~I received these for my honest review, all opinions are 100% my own.~

Who doesn't love flickering lights? They are such a good mood setting, but candles can be expensive and dangerous. I have used flicker tea lights for years but am in love with these Deluxe Flickering LED Tea Lights by GETCANDLED. They are super cute just how they come but I like to mix it up a little.

Do it Yourself Primitive Flicker Lights

What you Need- Everything can be found at Wallyworld!

A Pan to heat wax in. I prefer one you plug in. Just leave excess wax in for another project.
Wax (Brown if you can find it)
Brown and/or Black coloring
Cinnamon in a small dish or on wax paper.

1-Melt the wax in the pan, not too hot..you don't want to burn yourself.
2-Add a couple drops of brown coloring, and one of black. Add more as needed.

3-Dip lights in the wax and pull out. Immediately roll in cinnamon.
4-Repeat step 3 a couple times till it's the thickness you desire.

These pretty much dry instantly. Put in a dish or on your table...That's it!

Want to buy a box of your own to try? You can buy them on Amazon.