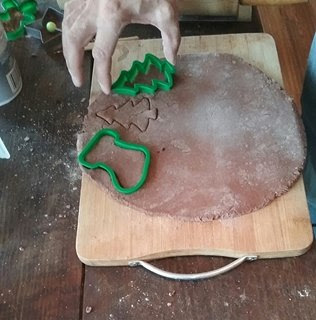
Have you been wanting to make your own ornaments? Or do you need a fun project at home for the kids? This year we moved and since we don't have all of our tools we thought it would be fun to try our hand at Salt Dough Ornaments. We've made different batches for weeks and here are the best ways to do them we've found. These are fairly quick and easy enough that the kids can make them too. You probably have all or most of the ingredients already in your home.
First off what ingredients do you need? Here is a list-
3 cups of All Purpose Flour
1 cup of Cinnamon + a jar with a sprinkle lid (Leave out if you want light Ornaments)
1 cup of Salt
1 1/2 cups (or thereabouts) of Water
Essential oils. Your choice, we used Cinnamon and Clove. Barefut makes an excellent Christmas Time or Tree Blend. You can buy it HERE.
Large Mixing Bowl
Rolling Pin
Spoon
Cookie Cutters
Baking Sheet
Dried Cloves, Juniper Berries or Seeds of some kind. Optional but look nice.
Shaping Tools and/or Toothpicks
String, or Ornament Hooks
Pastry Cutter Optional for all but Cabin.
Cooling Rack is optional but helps
Spray to seal. Optional but they will last longer. This should be the kind that dries clear and can be found at any hardware or big box store. Amazon also has a large selection HERE.
Start out with making the dough. Add all the dry ingredients in your mixing bowl. Stir well until fully mixed. Take out a small amount of this mix around 1/4 to 1/2 a cup and use to dust where you will be rolling and cutting out your ornaments. We did ours on a large wooden cutting board. Set this aside for now. You can also just use cinnamon.
In the measuring cup with your water add a few drops of your Essential Oils of choice. I added about 6 to 8. Stir this well and then gradually pour into your dry mixture while stirring. You may use Fragrance Oils but they don't smell as nice nor are they as good for you. Continue to add and stir your water in. You want a ball of dough. This should not be sticky, but nice and smooth.
Place your dough on your floured counter, table or cutting board. Pat it down and then start rolling. You want it to be about 1/4" thick all around.
Once the dough thickness is the right size start cutting out your shapes. Immediately move them onto your baking pan. You may grease it but I found you really don't need too, especially if you are using stoneware. If you have extra dough just re-roll and start the process over.
Try and use all the dough at once. You may refrigerate it but it becomes difficult to use and dries out fast.
Using either your little cutting tools or toothpicks work out a hole towards the top of your ornaments. Make this a good size to put string or a hook through. You do not need to leave the toothpick in it, it will not close.
Add any cloves, berries or seeds for buttons or decorations. Press these down deep and hard or they will fall off once baked. I love the way the Juniper berries look. You can buy them HERE from Amazon.
Bake the ornaments at 300 degrees for approx 30 minutes. Depending on the size and thickness these can take up to an hour. You want them to be dry but not burnt.
Pull them out of them over and transfer to a baking rack or someplace to dry. Once dry and cool, you can dust them with cinnamon or spray with the Sealing spray and dry. This shouldn't take but a few minutes if that. If you want to dust with cinnamon get them lightly wet, sprinkle the cinnamon over them, blow excess off or lightly shake. Then do the sealing spray. After dry add string or hooks and hang on your tree. You can do so many things with these. We did footprints and carved out Log Cabins. See visual instructions for those below. We did hand and footprints. For those make the dough slightly thicker and evenly press the hand or foot in. We did names and dates and we used our little tools to make our own patterns and designs like snowflakes. Your imagination is the limit.
First make your dough rectangular, just cut off the excess. Use your tools to draw lines in your dough. As many as you want including one for the cabin roof.
Use your tools to cut off the roof at an angle and then to cut a straight line for the edge of the cabin walls. Save this dough to make your doors and windows.
Take that extra cut off dough and lightly smooth with water. Cut off excess if needed to make the right size door and /or windows. You will also use the water to smooth it down onto the cabin so it will stick. Pat around the door edges into the cabin with your tools. This will ensure the door won't come off. You can also do this and add a chimmney if you'd like. This is a fun added touch.
I hope you enjoyed our little tutorial on making Salt Dough Ornaments. If you have any questions please don't hesitate to reach out!
~~Rebecca


No comments:
Post a Comment